crosley record player instruction manual
Crosley Record Player Instruction Manual⁚ A Comprehensive Guide
Welcome! This guide provides comprehensive information about Crosley record players․ Discover where to find your specific model’s manual, understand basic operations, troubleshoot common issues, and learn essential maintenance for optimal performance and longevity․
Finding Your Crosley Manual
Locating the correct instruction manual for your Crosley record player is the first step to ensuring proper use and care․ Several avenues are available to assist you in this process․ First, check the packaging that came with your Crosley turntable; often, the manual is included as a printed booklet․ If you no longer have the original packaging, don’t worry!
Crosley’s official website is an excellent resource․ Navigate to their support section and look for a “manuals” or “downloads” area․ Here, you can typically search for your specific model number to find a downloadable PDF version of the manual․
If you’re still unable to find it, numerous online manual repositories exist․ Websites such as ManualsOnline or Manualzilla often host a wide range of user manuals for various Crosley models․ Remember to have your Crosley model number handy to ensure you find the correct manual․
Online Manual Repositories
When the original manual is lost or misplaced, online manual repositories become invaluable resources for Crosley record player owners․ These websites serve as central hubs, collecting and organizing user manuals for a vast array of products, including Crosley turntables․ Some popular options include ManualsOnline, Manualzilla, and even sites like Archive․org․
To effectively use these repositories, it’s crucial to have your Crosley model number readily available․ Once you’ve located the appropriate website, use its search function and enter your model number․ The search results should lead you to a downloadable PDF version of your Crosley record player’s manual․
Be cautious and ensure the website you’re using is reputable․ Look for established sites with positive user reviews to avoid downloading potentially harmful files․ Always scan downloaded files with antivirus software before opening them, ensuring a safe and secure experience while accessing the information you need․
Identifying Your Crosley Model
Before seeking a manual, accurately identifying your Crosley record player model is paramount․ This ensures you access the correct instructions specific to your device, avoiding confusion and potential damage․ The model number is typically located on a sticker affixed to the unit․
Common locations for this sticker include the underside of the turntable, the back panel, or inside the dust cover․ The sticker usually displays the Crosley logo, the model name (e․g․, Cruiser, Voyager), and a series of alphanumeric characters representing the model number (e․g․, CR8005D, CR8017B)․
If the sticker is missing or illegible, consult any original packaging or purchase receipts you may have․ The model number should be clearly indicated on these documents․ Once you have accurately identified your Crosley model, you can confidently search for the corresponding manual online or contact Crosley customer support for assistance․ This diligent approach saves time and prevents the use of incorrect information․
Understanding Basic Operation
This section guides you through the fundamental operations of your Crosley record player․ Learn how to set up your turntable, play records, and adjust the speed for optimal listening․
Setting Up Your Crosley Turntable
Setting up your Crosley turntable is a straightforward process, ensuring you can quickly enjoy your vinyl collection․ First, unpack all components carefully, including the turntable, power adapter, and any included accessories like the 45 RPM adapter․ Place the turntable on a stable, level surface away from direct sunlight or heat sources․
Connect the power adapter to the turntable and a suitable power outlet․ Ensure the voltage matches your local requirements to prevent damage․ If your model has built-in speakers, they are automatically connected․ For external speakers, connect them using the appropriate audio cables to the RCA output jacks on the rear of the turntable․
Remove the stylus protector from the needle to prevent damage․ Finally, power on the turntable․ Your Crosley is now ready to play records, offering a blend of vintage aesthetics and modern convenience․
Playing a Record
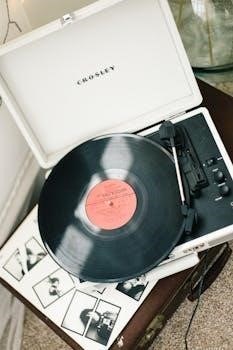
Playing a record on your Crosley turntable is a simple process that brings the warmth of vinyl to your listening experience․ First, gently place your chosen record on the turntable platter․ If you are playing a 45 RPM record, use the provided adapter by placing it over the spindle before positioning the record․
Next, ensure the stylus protector is removed from the needle․ Power on the turntable and set the speed selector to match the record’s RPM (33 1/3 or 45)․ Carefully lift the tonearm and position it over the edge of the record or the beginning of the first track․ Gently lower the tonearm using the cueing lever, if available, to avoid scratching the vinyl․
Adjust the volume to your desired level․ Once the record finishes playing, the turntable may stop automatically, depending on the model․ Return the tonearm to its resting position and replace the stylus protector for safekeeping․
Speed Adjustment
Ensuring your Crosley record player spins at the correct speed is crucial for accurate music playback․ Most Crosley turntables support two primary speeds⁚ 33 1/3 RPM (revolutions per minute) for LPs and 45 RPM for singles․ A speed selector switch, typically located near the tonearm or under the platter, allows you to choose the appropriate setting․
If your record sounds too slow or too fast, double-check that the speed selector matches the record’s format․ Some Crosley models have a fine-tuning adjustment, often found beneath the platter․ This allows for minor speed corrections if the turntable runs slightly off․
To access this, gently remove the platter (refer to your manual for specific instructions)․ You’ll usually find a small potentiometer that can be adjusted with a screwdriver․ Use a strobe disc or a speed-checking app to accurately calibrate the speed while making these adjustments, ensuring optimal audio fidelity․
Troubleshooting Common Issues
Encountering problems? This section addresses common Crosley record player issues․ Find solutions for sound quality, skipping, and Bluetooth connectivity․ Resolve issues efficiently and ensure enjoyable listening with our helpful troubleshooting guide․
Sound Quality Problems
Experiencing diminished sound quality with your Crosley record player can stem from several factors․ A common culprit is the stylus, particularly if it’s a ceramic type found in some models․ These can sound like an AM radio when connected to a hi-fi system․ Consider upgrading to a better stylus․
Check all connections to ensure they are secure and properly connected․ External speakers may enhance sound quality, as built-in speakers can sometimes be lacking․
Also, the turntable’s placement matters; avoid surfaces that cause vibration․ Ensure the record is clean and free of dust, as debris can affect playback․ Moreover, remove the dust cover during playback to prevent feedback, which can negatively impact audio clarity․
If sound issues persist, consult your Crosley manual․
Skipping or Sticking Records
Skipping or sticking is a frustrating issue with record players․ First, ensure the turntable is on a level surface to maintain proper tracking․ Check the record for scratches or debris that might cause the needle to jump; clean the record carefully․
The stylus condition is crucial; a worn or damaged stylus can easily skip․ Consider replacing it if it’s old or appears worn․ The tracking force, the pressure the stylus applies to the record, might be too light; consult your Crosley manual for adjustment instructions․
Also, verify the anti-skate setting, if available, is correctly set to prevent the arm from drifting inward․ Avoid placing the record player near speakers or on surfaces prone to vibration, as this can cause skipping․
If problems persist, professional servicing may be necessary․
Bluetooth Connectivity Issues (if applicable)
If your Crosley record player features Bluetooth connectivity, you might encounter pairing or connection problems․ First, ensure that Bluetooth is enabled on both the record player and your receiving device (speaker, headphones, etc․)․ Place devices within close proximity during pairing․
If previously paired, try unpairing and re-pairing the devices․ Clear the Bluetooth memory on both devices to remove old connections․ Check if other devices are interfering with the Bluetooth signal; move away from potential sources of interference like microwaves or other wireless devices․
Consult your Crosley manual for specific pairing instructions, as procedures can vary between models․ Ensure your receiving device supports the Bluetooth profile required by the record player․ Update the firmware on both the record player and receiving device if updates are available․
If connection issues persist, test with another Bluetooth device to isolate the problem․
Maintenance and Care
Proper care ensures your Crosley record player’s longevity and performance․ Regular maintenance includes needle replacement, cleaning techniques, and dust cover usage․ These steps will help you maintain optimal sound quality and protect your vinyl records․
Needle Replacement
Replacing the needle (stylus) on your Crosley record player is crucial for maintaining optimal sound quality and preventing damage to your vinyl records․ A worn or damaged needle can cause poor audio performance and even scratch your records․ It’s generally recommended to replace the needle every 50 to 100 hours of playtime, depending on usage and needle quality․
To replace the needle, first, consult your Crosley record player’s manual for specific instructions, as the process may vary slightly depending on the model․ Typically, you’ll need to gently remove the old needle, often by carefully pulling it downwards and outwards․ Then, align the new needle with the cartridge and gently push it into place until it clicks or is securely seated․
Always handle the needle with care to avoid damage․ It’s a good practice to use tweezers or wear gloves to prevent transferring oils from your fingers, which can attract dust and debris․ Regularly inspecting your needle and replacing it when necessary will ensure that your records sound their best and remain in good condition for years to come․ When selecting a replacement needle, ensure it’s compatible with your specific Crosley model․
Cleaning Your Crosley Record Player
Regular cleaning of your Crosley record player is essential for maintaining optimal performance and prolonging its lifespan․ Dust and debris can accumulate on various parts, affecting sound quality and potentially causing damage․ Before cleaning, always disconnect the record player from the power source to prevent electrical shock․
Start by gently dusting the exterior surfaces with a soft, dry cloth․ Pay attention to the turntable platter, tonearm, and base․ For more stubborn dirt, lightly dampen the cloth with a mild cleaning solution specifically designed for electronics․ Avoid using harsh chemicals or abrasive cleaners, as these can damage the finish․
The stylus (needle) also requires regular cleaning․ Use a stylus brush to gently remove dust and debris after each use․ Brush from back to front, following the direction of the record groove․ You can also use a specialized stylus cleaning solution sparingly․
Finally, clean your records before playing them․ Use a record cleaning brush and solution to remove dust and fingerprints, ensuring optimal sound quality and protecting your stylus․ Proper cleaning habits will keep your Crosley record player in top condition․
Dust Cover Use and Alternatives
The dust cover included with many Crosley record players serves a crucial role in protecting the turntable and records from dust, debris, and other potential contaminants․ When not in use, always keep the dust cover closed to prevent dust from settling on the platter, tonearm, and stylus․ This simple practice can significantly reduce the need for frequent cleaning and help maintain optimal sound quality․
However, some users prefer to remove the dust cover while playing records․ This is because the dust cover, if left on, can sometimes vibrate and cause feedback, particularly at higher volumes․ If you choose to remove the dust cover during playback, store it in a safe place to prevent scratches or damage․
As an alternative to the standard dust cover, you can use a microfiber cloth to gently cover the turntable when not in use․ This provides a lightweight and breathable barrier against dust․ Regularly cleaning your records before each play is another essential step in minimizing dust accumulation and protecting your stylus․
